
- Define your trip type (road trip, city, hiking) before mapping to select appropriate tools and features.
- Utilize Google Maps for navigation and Google My Maps for custom route plotting and multi-stop itineraries.
- Balance realistic drive times, overnight stays, and activity stops for optimal trip flow.
- Factor in real-time traffic and weather updates while traveling for dynamic adjustments.
- Save, share, and collaborate on your mapped routes with travel companions for seamless coordination.
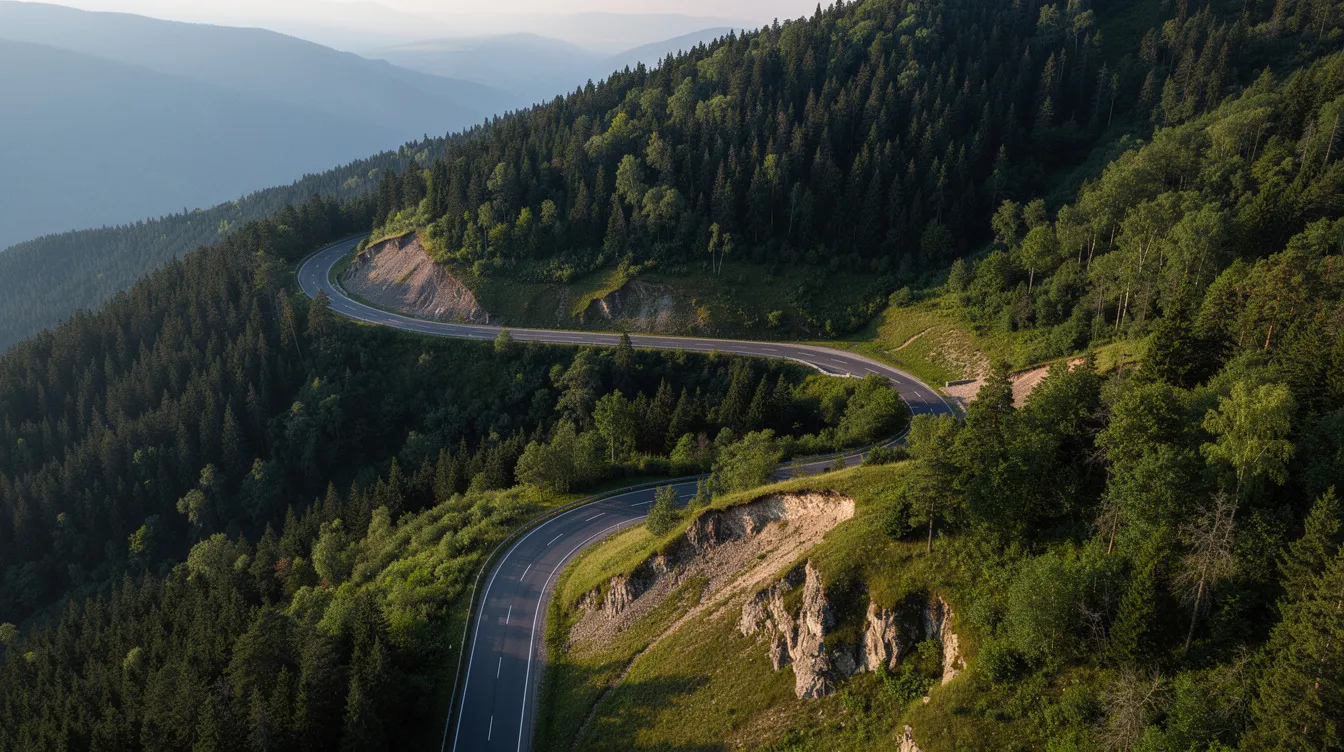
Map a Trip: Plan, Route & Optimize Every Mile
Planning a trip in 2026 means more than booking flights and hotels. It means understanding the shape of your journey before you ever leave home. When you map a trip, you translate loose travel ideas into something tangible: a visual route you can follow, adjust, and share. Whether you are sketching a simple driving path between two cities or building a detailed, multi-day itinerary with stops, costs, and reservations, the process starts the same way. You open a map and start plotting points.
This guide focuses on practical, step-by-step mapping for real trips happening this year and next. Think a June 2026 USA road trip through the desert Southwest, a week exploring Italy in May, or a long weekend city break in London. You will learn how to choose the right mapping tools for your trip type, plot stops that make sense geographically and logistically, factor in traffic and weather, and save or share your custom route with travel partners.
Here is what we will cover:
- Deciding your trip type before touching any tools
- Selecting the right combination of free and paid mapping apps
- Building a road trip route step by step with realistic examples
- Balancing drive time, overnight stays, and stops
- Using real time traffic and weather while traveling
- Mapping walking, cycling, and running routes
- Saving, sharing, and collaborating on your mapped trip
- Common mistakes and how to avoid them
- A complete example putting everything together
Introduction to Trip Planning
Trip planning is the foundation of a successful journey, whether you're setting out on a cross-country road trip, a city adventure, or a weekend getaway. With so many destinations and routes to choose from, having a reliable route planner is essential for creating an itinerary that matches your preferences and travel style. Tools like Google Maps make it easy to map out multiple locations, compare routes, and find the best way to reach your destinations. You can create and save custom routes, view directions for each segment, and adjust your plan as needed. By taking advantage of these features, you'll navigate your journey with confidence, save valuable time, and ensure that every stop along the way fits your ideal travel experience. Whether you're exploring a new city or hitting the open road, a thoughtful plan lets you focus on the excitement of discovery rather than the stress of logistics.
Choose your core trip type before you map anything
Before you open Google Maps or download an app, take a moment to decide what kind of trip you are actually planning. This sounds obvious, but it changes everything about how you approach the mapping process. A road trip across California has completely different mapping needs than a walking tour of Rome or a cycling loop through Tuscany.
Identifying your primary trip style first makes the entire process faster and more focused. You will know which tools to use, which features matter, and which sections of this guide deserve your attention.
Consider these concrete examples:
- A 7-day California coastal road trip from San Francisco to San Diego in September 2026. This is a classic driving route where you need fuel stops, rest breaks, and drive time segments broken into comfortable daily distances.
- A 10-day Italy trip in May 2026 visiting Rome, Florence, and Venice. This is a multi-city itinerary where you need train schedules between cities and walking routes within each destination.
- A long weekend hiking in Rocky Mountain National Park in July 2026. This requires elevation profiles, trail difficulty ratings, and offline access for areas with poor cellular coverage.
Each trip type demands different mapping priorities:
- Road trips need realistic drive time estimates, fuel station locations, scenic route alternatives, and logical overnight towns
- City trips need walking routes, public transit overlays, and attraction clustering to minimize backtracking
- Hiking or cycling trips need elevation profiles, surface type information, and offline map functionality
Once you know your trip type, you can skip straight to the sections that matter most to you.
Pick the right tools to map a trip (free & paid options)
The fastest way to overcomplicate trip planning is to juggle ten different apps. The best approach is simpler: pick two or three well-chosen tools that cover your specific needs and learn them well. A thoughtful combination of a route planner for navigation, an itinerary app for organization, and possibly a specialized activity tool will handle nearly any trip type.
Google Maps and Google My Maps form the foundation for most trip mapping. Google Maps excels at turn-by-turn navigation, real-time traffic, and finding local businesses like hotels and restaurants along your route. Google My Maps lets you create custom maps with dropped pins, drawn routes, and detailed notes for each location. Google My Maps is the best tool for creating custom, interactive maps with layers for hotels, restaurants, and sights. For a July 2026 Denver to Yellowstone road trip, you might build the entire route in Google My Maps, add pins for specific campgrounds and viewpoints, then open those locations in Google Maps on your phone when you need navigation.
Dedicated road trip planners like Roadtrippers and AAA TripTik serve specific use cases. Roadtrippers focuses on discovering roadside attractions, quirky stops, and points of interest across the US and Canada. It helps you find things you did not know existed. AAA TripTik emphasizes practical logistics: fuel prices, toll estimation, and traffic overlays for road-focused planning. These tools bridge the gap between simple navigation and true itinerary building.
Itinerary apps like Wanderlog and TripIt solve a different problem. They organize bookings, reservations, and daily plans into a unified timeline. Forward your hotel confirmation email to TripIt, and it automatically adds that stay to your itinerary with the address, check-in time, and confirmation code. Wanderlog adds collaborative features where multiple travelers can add attractions, notes, and budget items to a shared trip plan. For saving a 3-day New York City walking route, Wanderlog keeps everything organized by day and lets you share it with friends.
Activity-focused tools like AllTrails and On The Go Map serve hiking, cycling, and running routes. AllTrails provides trail difficulty ratings, elevation profiles, and offline map downloads for areas without cellular coverage. On The Go Map offers route building with elevation analysis for cyclists and runners who need to understand the terrain before they commit.
The key is matching tools to trip type. Road trips benefit from Google My Maps plus a dedicated planner like Roadtrippers. City trips work well with Google Maps walking mode plus an itinerary app. Outdoor adventures need AllTrails or similar tools that understand trails and elevation.
How to map a road trip route step by step
This is the core use case when people search for how to map a trip: plotting a driving route with multiple stops over multiple days. The process involves entering your start and end points, adding waypoints for attractions and overnight stays, and then refining the route until it makes sense geographically and logistically.
Step-by-Step Road Trip Mapping Procedure
- Enter your start and end points in your chosen mapping tool.
- Add waypoints for attractions, overnight stays, and key stops.
- Adjust the route to follow scenic highways or preferred roads.
- Check estimated drive times for each segment.
- Optimize the order of stops for efficiency and enjoyment.
- Review the route for logical daily segments and adjust as needed.
Example Route 1: Los Angeles to Grand Canyon
Start by opening Google Maps or AAA TripTik and enter Los Angeles as your origin and Las Vegas as your destination. The direct route is about 270 miles via Interstate 15, roughly 4.5 hours of driving. But this trip is not about getting to Vegas fast. It is about the journey through the desert Southwest. If you're starting your California leg from the coast, the LA Canyons & Coast route pack is an excellent warm-up before heading inland toward the canyon country.
- Add your major waypoints: Grand Canyon National Park (South Rim), Zion National Park, and perhaps a stop in Flagstaff, Arizona for an overnight stay.
- With these multiple destinations added, your route expands to roughly 600 to 700 miles over 5 to 6 days of travel.
- Note that Google Maps allows up to nine stops per route, so plan accordingly if you have many waypoints.
- Adjust the route to follow scenic highways instead of the fastest interstate. For example, route through US 89 to see more of the Arizona landscape.
- Check the estimated drive time for each segment. Google Maps will display hours and miles between each stop, letting you see whether any single day involves too much driving.
Example Route 2: Boston to Acadia National Park
Enter Boston as your start and end point, with Acadia National Park (specifically Bar Harbor, Maine) as your primary destination. The direct route via I-95 covers about 280 miles and takes roughly 4.5 to 5 hours.
- Add intermediate stops along the way: perhaps Portland, Maine for lunch on the way up, and a scenic coastal town like Camden for a break on the return.
- Add specific locations within Acadia like Cadillac Mountain, Jordan Pond, and Sand Beach as waypoints to visit during your time in the park.
- For the return trip, consider routing along US Route 1 for at least part of the journey. This adds time but delivers the kind of coastal New England scenery that makes fall foliage trips memorable.
- The mapping tool will show you the time difference between routes, letting you choose the tradeoff between speed and views.
In both examples, the process follows the same pattern: enter start and end points, add 5 to 10 waypoints for places you want to see, adjust the route to follow roads worth driving, and check that daily drive times stay realistic.
Balancing drive time, stops, and overnight stays
A raw line on a map is just the beginning. Turning that line into a comfortable day-by-day plan requires breaking long distances into realistic segments.
Choosing Overnight Stops
The fundamental rule for leisure road trips: plan for 4 to 6 hours of driving per day maximum. This leaves time for sightseeing, spontaneous stops, and rest. A 1,000-mile route should be divided into 3 to 5 days of driving, not crammed into two exhausting days behind the wheel.
- Identify your overnight towns. These should be roughly 250 to 400 miles apart, depending on terrain and available attractions.
- For the Los Angeles to Grand Canyon to Las Vegas trip, logical overnight stops include Flagstaff, Arizona (about 4.5 hours from Los Angeles) as a base for Grand Canyon day trips, Springdale or Kanab, Utah (near Zion National Park) for a night or two, and Las Vegas as the final destination.
Planning Fuel and Food Breaks
- Insert regular fuel, food, and rest stops about every 2 to 3 hours on the map.
- Google Maps shows gas station locations along your route, but pay attention to station density.
- Rural stretches through Nevada or Utah's canyon country may have 100-mile gaps between fuel stops, requiring advance planning.
Concrete Examples of Drive Segments
- San Francisco to Monterey and Carmel: 120 miles, approximately 2.5 hours without stops. This is a comfortable morning drive that leaves the afternoon free for exploring the peninsula's famous 17-Mile Drive and Carmel-by-the-Sea.
- Paris to the Loire Valley: about 2.5 hours of driving. Map specific chateau stops like Chambord and Chenonceau, then plan a leisurely day of castle hopping with a lunch break in a small town.
The goal is travel times that feel sustainable. If your mapping tool shows a 7-hour drive for a single day, that segment needs to be broken up or you need to accept that day will be primarily about driving.
Optimizing your mapped route for cost and time
Once your route is drawn, you can refine it for fuel costs, tolls, and total travel time using filters and settings in your mapping tool.
Filtering for Tolls and Fuel Costs
- Google Maps allows you to filter toll roads when calculating directions. This is useful for comparing the toll-heavy but fast route against the slower, free alternative.
- For a drive between Madrid and Barcelona, you might compare the direct AP-2 toll highway (about 6 hours) against a scenic route through Zaragoza and smaller highways (8 to 9 hours but potentially more interesting and less expensive).
- Some tools like AAA TripTik display fuel price layers or gas station icons showing current prices. This is particularly valuable in remote areas where prices vary dramatically.
Comparing Alternate Routes
- I-95 vs coastal US Route 1 between New York and Boston: I-95 is faster by 1 to 2 hours, but US-1 through Connecticut and Rhode Island delivers coastal views and small town character.
- The straight line across Nevada via I-80 vs the more scenic US-50: I-80 saves hours, but US-50 is known as the loneliest road in America and offers a completely different experience.
Time of Day Optimization
- A summer 2026 cross-country US trip that includes passing through Chicago should avoid weekday rush hours between 5 and 7 PM.
- Scheduling a night departure or early morning drive through major metro areas preserves daylight hours for sightseeing and cuts travel time significantly.
Scenic routes and attractions: making your journey memorable
A memorable trip isn't just about reaching your destination — it's about the experiences you collect along the way. Using a route planner, you can uncover scenic routes and must-see attractions that transform a simple drive into an unforgettable adventure. Whether you want to detour through a national park, visit a quirky roadside museum, or find the perfect viewpoint, a route planner helps you discover and organize these highlights.
For California driving specifically, the Big Sur Classic remains the gold standard — 90 miles of cliff-edge highway between Carmel and San Simeon that no mapping app can fully prepare you for. Further north, the Bay Area Skyline route links the Santa Cruz Mountains to the Marin Headlands for a full day of elevated driving above the fog line. And if you're heading south from LA, the Santa Barbara Coast route delivers the kind of unhurried coastal miles that make the Pacific Coast Highway famous. For a comprehensive overview of the best routes along the California coast, see our guide to road tripping the West Coast.
Don't forget to check for road closures or construction before you go, ensuring your travel is as smooth as it is scenic. By weaving attractions and scenic segments into your mapped route, you'll turn every mile into part of the adventure.
Use real time traffic, weather and conditions while you travel
A static map is only the starting point. Real-world conditions change constantly, and the route you mapped three weeks ago may need adjustment the morning you leave.
Live traffic layers in Google Maps show current congestion and help you avoid rush hour around large cities. Los Angeles traffic is worst between 7 and 9 AM and 4 and 7 PM on weekdays. London's congestion charge zone creates its own patterns. Toronto's highways can add hours to a simple crossing. Your mapping tool should account for these patterns, and you should check real-time conditions before each day's departure.
Weather forecasting integrated with route mapping is becoming standard. Apps like Driveweather and mainstream weather apps can overlay forecasts on your mapped route, showing where storms, snow, or extreme heat might affect driving conditions.
Specific Examples of Real Time Adjustments
- Shifting your driving window on an Atlanta to Miami drive in June 2026 to avoid afternoon thunderstorms common in the Southeast summer.
- Checking for seasonal pass closures like Tioga Pass in Yosemite before mapping a June 2026 California loop. Tioga Pass typically opens in May or June depending on snowpack and could still be closed in early June during heavy snow years.
- Monitoring Colorado mountain passes for winter conditions on a January 2026 drive through the Rockies and having contingency routes identified.
- Checking border crossing wait times before a Seattle to Vancouver day trip, where Peace Arch can add 30 minutes to 2 hours depending on traffic.
The key is treating your map as a living document. Check conditions the night before travel and again each morning. Adjust departure times, routes, and stops based on what is actually happening rather than what you planned weeks ago.
Mapping walking, cycling, and running routes
Many people who search for how to map a trip are not planning road trips at all. They want to design running routes near their hotel, cycling loops through wine country, or walking tours that efficiently connect city attractions.
The mapping approach changes significantly for these trip types. Instead of drive time and fuel stops, you are thinking about distances, elevation, surface types, and safety.
Google Maps offers walking and biking modes that calculate pedestrian and cyclist routes through cities like Paris, Tokyo, or New York. These modes account for pedestrian pathways, bike lanes, and stairs that cars cannot use. For a walking tour through Rome in May 2026, switching to walking mode shows realistic times between the Colosseum and the Pantheon based on actual pedestrian routes.
Tools like On The Go Map and AllTrails provide features that Google Maps lacks: elevation profiles, surface type identification (paved vs gravel vs dirt), and difficulty ratings. Mapping a 10 km running route near a hotel in Berlin becomes much easier when you can see elevation gain and locate flat paths along the Spree River. A half-day cycling loop through Paso Robles wine country in September 2026 requires understanding the rolling terrain and identifying routes that use bike lanes or quiet country roads.
Important Considerations for Activity Routes
- Check path safety and bike lane availability before committing to a route.
- Consider daylight hours, especially for winter travel. A December walking tour in London has only about 8 hours of daylight.
- Download the route offline on your phone for use without data, especially important for trail running in areas with poor coverage.
- Export routes in GPX format if you plan to use a GPS watch or fitness tracker.
Creating self-guided city walking tours
This subsection focuses on mapping a walk that links major sights efficiently without backtracking. The goal is designing a logical loop that minimizes total walking distance while hitting everything on your list.
Steps to Create a Self-Guided Walking Tour
- Drop pins for each sight in Google Maps or a similar app.
- Reorder the pins to minimize total distance.
- Estimate total walking time using your mapping tool.
- Add cafe or lunch stops in your plan as waypoints.
- Save and share your walking route for easy access.
For example, a one-day Rome walking loop in May 2026 connecting six major attractions: the Colosseum, Roman Forum, Trevi Fountain, Spanish Steps, Piazza Navona, and the Pantheon. These sites are spread across central Rome, covering roughly 8 to 10 kilometers in the most efficient sequence.
An efficient route might start at the Colosseum, walk to the Roman Forum (immediately adjacent), then proceed north toward the Pantheon, Trevi Fountain, Spanish Steps, and finally Piazza Navona. A London walking route works the same way — Westminster, Big Ben, Buckingham Palace, Trafalgar Square, and Covent Garden cluster into two groups that can be covered in roughly 3 to 4 hours including brief stops.
Budgeting and packing for your mapped trip
Smart budgeting and efficient packing are key to a stress-free trip. With a route planner or Google Maps, you can estimate travel times and distances, helping you plan for fuel costs, hotel stays, and daily expenses. Use these tools to find hotels, restaurants, and other points of interest along your route, making it easier to budget for each segment of your journey. When packing, consider the activities and weather at your destinations — Google Maps can help you check local forecasts and locate stores if you need last-minute supplies.
Packing and Budgeting Tips
- Create a packing checklist tailored to your mapped route, ensuring you have everything from travel documents to weather-appropriate clothing.
- Use a budgeting app to track expenses as you go.
- Check local forecasts and plan for weather-appropriate gear.
- Locate stores along your route for last-minute supplies.
By planning your route, budgeting carefully, and packing thoughtfully, you'll be ready for whatever your trip brings — leaving you free to enjoy the journey.
Save, share, and collaborate on your mapped trip
The map you build is only useful if you can access it easily while traveling and share it with anyone joining you. Modern mapping tools make this straightforward, but the workflow varies depending on which tools you use.
- Google My Maps allows saving custom routes to your Google account. Once saved, you can access the map on any device by logging in. On your phone, open the Google Maps app, tap Saved, then tap Maps, and your custom maps appear. From there, you can navigate to any pin you dropped or follow the route you drew.
- Itinerary apps like Wanderlog allow sharing trips with collaborators who can add their own stops and notes to a shared plan.
- For group trips like an August 2026 Scotland driving tour with multiple drivers, collaborative features become essential. Everyone needs to see the same plan, know the day's destinations, and understand their driving segment.
When to Export GPX or KML Files
- Cycling routes you want to load onto a Garmin bike computer.
- Running routes for a GPS watch that navigates offline.
- Hiking routes for areas without cellular coverage.
Privacy settings differ across tools. Google My Maps can be set to private (accessible only to people with the link) or shared publicly. Wanderlog distinguishes between private sharing among invited collaborators and public links visible to anyone. For most personal trips, private sharing is appropriate unless you want to share your route publicly as travel inspiration.
Printing maps and using paper backups
Despite smartphones and mapping apps, printed paper maps still serve important functions. They provide security against dead batteries, lost phones, or areas with poor cellular reception.
Paper Map Backup Tips
- Create simplified printed overviews of each day's route, including start point, end point, and major waypoints, approximate mileage and drive time, key highway numbers and exit numbers for critical turns, and the overnight stop location with address and confirmation code.
- Annotate printed maps with daily mile ranges and key navigation notes.
- Combine printed state or country maps with digital navigation for remote areas.
Practical scenarios where paper backups matter: driving through areas with poor reception on US Route 50 in Nevada in summer 2026, where cellular signals can disappear for 100 miles at a stretch; rural European routes in the Alps where tunnels and mountains disrupt cellular signals for extended periods; and remote portions of the Scottish Highlands and Oregon Coast where coverage is unreliable.
Community and resources for trip mapping inspiration
You don't have to plan your trip alone — there's a vibrant community of travelers and a wealth of online resources ready to help you map the perfect route. Platforms like Roadtrippers and Furkot offer route planning tools packed with inspiration for road trips of all kinds. Online forums and social media groups are great places to connect with fellow travelers, share your Google Maps routes, and get recommendations for must-see stops. By tapping into these communities and tools, you can discover new destinations, get answers to your travel questions, and refine your plans with real-world advice.
For curated, expert-planned drive packs across the US, our Best American Road Trips 2026 guide covers 14 of the country's most rewarding routes with detailed planning notes for each.
Common mistakes when mapping a trip and how to avoid them
Even the best tools cannot fix unrealistic plans. Here are the most common pitfalls and how to avoid them:
- Planning 10-hour drive days back to back without rest or sightseeing time. A 1,000-mile route might look manageable as two 500-mile days on paper. In practice, 500 miles means 7 to 8 hours of continuous driving, plus fuel stops, meals, and rest breaks. Two days of this is exhausting and potentially unsafe. Fix: Cap daily driving at 4 to 6 hours for leisure trips. A 1,000-mile route needs 3 to 5 days, not 2.
- Ignoring time zones on cross-country USA drives. A drive from Denver to Kansas City crosses from Mountain Time to Central Time. A traveler leaving Denver at 8 AM Mountain Time arrives in Kansas City around 3 PM Central Time (7 hours driving plus 1 hour time zone change). Fix: Track all time zone crossings explicitly on your mapped trip and use destination time zone clocks throughout planning.
- Not checking opening hours or ticket times before mapping exact arrival windows. A meticulously planned itinerary might have you arriving at a national park at 2 PM, only to discover it closes at 4 PM that day or that the specific area you wanted to visit is closed for maintenance. Fix: Research opening hours, seasonal closures, and timed entry ticket requirements 2 to 4 weeks before travel.
- Underestimating border crossing times. A Vancouver day trip from Seattle might appear to be only 3 to 4 hours of driving. But border crossing at Peace Arch can add 30 minutes to 2 hours depending on traffic and security protocols. Fix: Research typical wait times at specific border crossings and add 30 to 60 minutes to crossing time estimates when mapping international routes.
- Overlooking seasonal road closures. A June 2026 California loop depending on Tioga Pass might find the pass still closed due to lingering snow. Alpine passes throughout the Rockies and Cascades have seasonal closures that vary year to year. Fix: Check road closure databases 1 to 2 weeks before travel and confirm all planned routes are open. Have contingency routes identified for critical segments.
Last-minute tips and reminders before you go
As your departure day approaches, a few last-minute checks can make all the difference:
- Use Google Maps to review your route, check real-time traffic, and adjust your plan if needed.
- Look up the weather forecast for each destination.
- Make sure your vehicle is road-ready, with all maintenance and paperwork up to date.
- Pack essentials like snacks, water, and a first-aid kit.
- Double-check that you have all necessary documents.
- Share your itinerary with a trusted friend or family member, so someone knows your route and can reach you if needed.
Taking these final steps ensures you're prepared for the road ahead, letting you focus on enjoying your trip from the very first mile.
Putting it all together: a sample mapped trip
Let us walk through one complete example from concept to final map, using techniques from all the previous sections.
The scenario: a 9-day June 2026 Pacific Northwest road trip
The route covers Seattle, Mount Rainier, Portland, the Columbia River Gorge, Cannon Beach, and back to Seattle. This is a road trip with scenic driving and outdoor stops as core components, covering approximately 900 to 1,000 miles over 9 days. The Oregon Coast route pack covers the most scenic stretch of this journey — from Cannon Beach south through the dramatic sea stacks and headlands of the central Oregon coast.
- This is a road trip, so the primary tools are Google My Maps for route building and an itinerary app like Wanderlog for organization and collaboration.
- If traveling with family or friends, share the Wanderlog trip so everyone can contribute ideas.
Mapping Each Driving Segment
- Day 1: Seattle to Mount Rainier area (90 to 100 miles, 2 to 3 hours driving). Overnight in Longmire or Ashford near the park's western entrance.
- Day 2: Full day at Mount Rainier, exploring Reflection Lakes and the Paradise area. Minimal driving, overnight in the same location.
- Day 3: Mount Rainier area to Portland (200 to 240 miles, 3.5 to 4 hours). Follow I-5 directly or take a scenic inland route through Olympia and Salem. Overnight in Portland.
- Day 4: Portland to Columbia River Gorge (50 to 60 miles, 1.5 to 2 hours). Drive Historic US Route 30 to see Multnomah Falls and other waterfall stops. Overnight in Hood River or Troutdale.
- Day 5: Full day in the Columbia River Gorge for hiking and waterfall viewing. Overnight in the same area.
- Day 6: Columbia River Gorge to Cannon Beach (100 to 120 miles, 2 to 2.5 hours). Overnight at the coast.
- Day 7: Cannon Beach and surrounding coast. Explore Haystack Rock, Short Beach, and coastal trails. Overnight in Cannon Beach or start heading back toward Portland.
- Day 8: Return driving toward Seattle (220 to 250 miles via Portland, 3.5 to 4 hours). Overnight in Olympia or Salem if needed.
- Day 9: Complete the return to Seattle (remaining 2 to 3 hours if departing from a mid-route stop).
Adding Key Attractions
- In Google My Maps, drop pins for Multnomah Falls, Ruby Beach (if extending the trip to the Olympic Peninsula), Paradise Visitor Center at Mount Rainier, Cannon Beach, and viewpoints along US 101.
- Add notes to each pin with relevant details like parking locations or best times to visit.
Layering in Lodging, Fuel Stops, and Food Recommendations
- Add lodging pins for each overnight location with confirmation numbers in the notes.
- Add fuel stops in logical positions, especially before the more remote mountain sections.
- Save restaurant recommendations discovered during research.
Exporting or Sharing the Final Map
- Share the Google My Maps link with everyone traveling. Give edit access if you want them to add their own discoveries.
- In Wanderlog, share the trip so everyone has the day-by-day itinerary on their phone.
The Pacific Northwest trip demonstrates how all the pieces connect. You start with a trip type, select appropriate tools, map realistic daily segments, add attractions and logistics, and share the result. The map becomes a living document that guides your journey while remaining flexible enough to accommodate discoveries along the way.
The best trip you will take this year starts with opening a map and dropping your first pin. Pick a date. Choose your destinations. Start mapping. The road, the trail, the city streets — whatever your journey looks like, it is waiting for you to discover it. Open Google My Maps, Wanderlog, or whatever tool fits your trip type, and build your first route today. The planning is part of the adventure.
Articles Connexes

Rent a Ferrari in Los Angeles
Los Angeles offers year-round Ferrari-friendly weather, iconic routes like Pacific Coast Highway, Sunset Boulevard, and Mulholland Drive, plus luxury hotspots including Beverly Hills and Malibu. This guide covers where to drive, rental requirements, model options, booking tips, and exclusive services.
Trip Planner Road Book: Plan, Book, and Hit the Highway with Confidence
A trip planner road book is a dedicated digital tool that organizes multi-day, multi-stop driving journeys — handling routes, daily driving limits, overnight stays, attractions, fuel stops, and budgets in one place. This guide covers everything you need to know.

Tours de conduite autoguidés
Les tours de conduite autoguidés sont le moyen ultime de vivre la route ouverte, offrant aux conducteurs la liberté d'explorer à leur propre rythme. Ce guide complet couvre la planification, le budget, la préparation des bagages et les meilleurs itinéraires à travers les États-Unis, le Royaume-Uni et l'Europe pour 2026 et 2027.
Parcourez les routes que vous venez de lire
L'adhésion The Stable arrive bientôt — un abonnement pour chaque itinéraire sélectionné de notre bibliothèque, avec points de rallye détaillés, guides gastronomie & vins et hébergements. À partir de $6.97/mois.